|
|
| Overview |
|
The tools menu is designed for configuring SELLmatix Point of Sale. This menu
can only be accessed by Clerks who have configure rights. Many of the
options on this menu also require that users logged in when Windows starts
have Administrator rights.
Accessing options on this menu in the wrong manner will cause SELLmatix to
stop working correctly. In general, it is a good idea to stop access to
the SELLmatix POS menu commands unless an "administration" clerk is logged in.
For more information on stopping access to the SELLmatix POS menu commands,
see the SELLmatix Control Clerk
Configuration documentation.
Back to top
|  |
| Site Information |
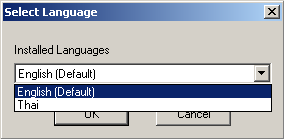
This option allows you to select the language in use by SELLmatix Point of Sale. Using languages other than English
requires the installation of SELLmatix POS language pack for the language you require. Only the language packs installed will
appear as options in this dialog.
When a language is selected, the new language is used immediately, and when the OK button is pressed, all menus and dialogs will
appear in the new language. If you are unable to understand a language and need to switch between languages, then you should
take not of the fact that the Language Dialog is the first option on the second last menu selection of SELLmatix. Otherwise you
may have difficulty navigating back and selecting a language you can understand.
SELLmatix language preferences are stored on a per user basis. If one person logs in to Windows as Fred and selects English as their
language, then English will be used by SELLmatix POS whenever it is run when the user Fred is logged into windows. Other users will also
have their language preferences used.
Back to top
| |
| Site Information |
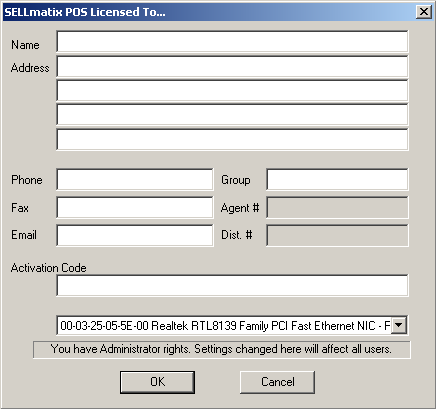
This option allows you to enter information about the site that is printed
on receipts and reports etc. as well as Software License information.
Available information is as follows:-
Name is the name of the retail store.
Address is the address of the store.
Phone is the phone number of the store.
Fax is the fax number of the store.
Email is the email address of the store.
Site ID is made up of two parts being a group name and then a
location name separated by a slash (/) character. This information is used
in bureau environments for consolidation purposes.
Changing these options requires that the user be logged into Windows with
rights as an Administrator on that local machine. If the user has
Administrator rights, a message at the bottom of this Dialog will warn
that the user has Administrator Rights and that any changes will affect
All Users on this computer. If the User does not have rights as a Windows
Administrator on this machine, the fields will be displayed, but they will
be grayed out, and a message will be shown saying that Administrator Rights
are required to make changes to this screen.
Back to top
| |
| General Settings |
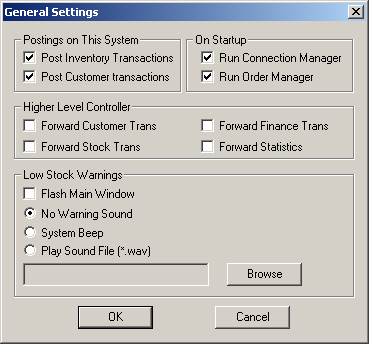
SELLmatix Control can be used to:-
- Directly Control POS terminals in a shop/restaurant
- Run in a Head Office, controlling other instances of SELLmatix Control that run in shops using an internet connection.
Postings On This System
These setting determine posting made on this system.
- If this instance of SELLmatix Control runs in a shop controlling POS terminals, and there is no higher level
head office system, then both these boxes should be checked.
- If this instance of SELLmatix Control runs in a shop controlling POS terminals, and there is a head office system:-
- If the head office system administers your inventory, uncheck "Post Inventory Transactions" box.
- If the head office system does not administer your inventory, check "Post Inventory Transactions" box.
- If the head office system administers your customer accounts and issues statements, uncheck "Post Customer Transactions" box.
- If you administer your customer accounts and issue customer statements, check "Post Customer Transactions" box.
- If this instance of SELLmatix Control runs in a head office:-
- If this instance of SELLmatix Control tracks inventory in the stores and overall, check the "Post Inventory Transactions" box.
- If the stores administer their own inventory, then uncheck the "Post Inventory Transactions" box.
- If you maintain customer balances and issue customer statements, check the "Post Customer Transactions" box.
- If the stores maintain customer balances and issue statements, uncheck the "Post Customer Transactions" box.
Higher Level Controller
These settings determine what information will be passed up to a higher level head office controller. There can be multiple levels of higher level controller where required.
For example, the instance of SELLmatix Control that runs in a shop may pass certain types of transaction to a Head Office Controller, which may in turn
pass certain types of transactions to a State Head Office Controller which may in turn pass certain types of transactions to a county Head Office Controller etc.
These setting determine what transactions are passed up to a higher level controller by this instance of SELLmatix Control.
- If there is no higher level controller, then all these boxes should be unchecked.
- If transactions charged to Customer accounts should be passed up to a higher level controller which issues statements and is responsible for maintaining balances, you should check the "Forward Customer Trans" box.
- If inventory transactions need to be passed to a higher level controller, you should check the "Forward Stock Trans" box.
- If financial transactions need to be passed to a higher level controller, you should check the "Forward Finance Trans" box.
- If statistics need to be passed to a higher level controller, you should check the "Forward Statistics" box.
On Startup
This section allows you to specify options when SELLmatix Control is started. If Run Connection Manager is Checked, then
Connection Manager Automatically starts when Control is run. This box would normally be checked.
If Run Order Manager is checked, then Order Manager starts automatically when Control runs. This would normally be checked in
a restaurant installation using kitchen and bar printers, but this option would not normally be set in a general retail installation where kitchen and bar printers were not used.
Low Stock Warnings
These options allow you to set low stock warning options, so that when low stock situations arise during trading, you can be alerted so that
stock items can be replenished.
Low stock warnings can be triggered when all of the following conditions arise:-
- SELLmatix Control is tracking the Qty on hand for an item which is sold.
- The Reorder Level for the item contains a value greater than zero.
- The available quantity (Qty on Hand minus Qty Allocated) is less than the Reorder Level.
No alert will be generated unless all of these criteria are met.
This dialog allows you to specify the type of alert to generate.
Flash Main Window causes the title bar of SELLmatix Control and the Icon in the Task Bar to flash until such time as SELLmatix
Control gains the keyboard focus and becomes the foreground window.
Warning Sounds specify the sound to be generated when low stock warnings occur. These options require a speaker in the PC or a sound card and speakers
in order to work.
Low stock warnings occur when an order is processed that places the available quantity of an item below the reorder level.
When a low stock warning occurs, the item which generated the warning is shown in Connection Manager.
When a low stock warning occurs, you should print a Reorder Report from the Print Menu, because there may be additional items that also
need to be replenished. The fact that no item is shown as being low in stock in Connection Manager does not mean that there are no items
that need to be replenished, just that no orders have been taken for low stock items.
If a low stock warning is ignored, it will be generated again the next time that an order is taken for an item which is low in stock.
Back to top
| |
| Calculation Options |
Overview
Most people do not realise this, but the order in which calculations are
performed and where rounding occurs on the POS can change the amount of
the extended line total.
When an item is sold, there are 3 steps involved in calculating the line
total. These are:-
- Multiplying the price by the quantity
- Calculating the Discount
- Calculating the amount of tax
In addition, the amount can be rounded if there is less than one cent
involved at any stage in this process. Consider the following calculation
examples for selling 3 jars of Nescafe Gold Blend Coffee where the price
is $8.97 not including retail tax of 10% with no discount applicable and
rounding the total to the nearest cent.
Calculation=Extend Line, Discount, Tax
3 Qty X $8.97 = $26.91
Tax @ 10% = $2.691
Line Total = $29.601
Rounded Total = $29.60
Calculation=Tax, Discount, Extend Line
Tax @ 10% = $0.897
Price Inc = $9.867
Rounded Price = $9.87
3 Qty X $9.87 = $29.61
This may not seem important, but there are a number of consequences:-
Back Office Systems
Different back office systems calculate the line totals differently. If
SELLmatix calculates the line totals differently to the back office system,
and you then import the transaction into the back office system for example
where the sale is charged to the other account, the back office system will
either refuse to import the transaction saying that it does not balance, or
else, the back office system will recalculate the line total, and the amount
that appears on the customer's statement will be different from their
SELLmatix receipt.
The above example does cause a problem with popular Back Office Accounting
packages QuickBooks and MYOB, if the SELLmatix calculation options are set to
be different from the Back Office System.
Retailer Benefit
Modifying the order in which SELLmatix makes calculations and the type of
rounding calculations that are made to benefit the retailer could, over the
course of a year make a significant contribution to the profit of the
retailer. For example a POS which processed 50 transactions per day and was
able to round each transaction up by only 1 cent, this additional rounding
margin would more than pay for SELLmatix software just from this feature
alone. We believe that careful use of this feature can yield much better
returns than this example.
The key issue however, is what is required by the back office system, and
you should check and test to ensure that transactions can be imported
without recalculation problems in the Back Office System.
When this menu option is selected, a Dialog Box appears which allows you to
change the calculation options. The fields that can be configured are as
follows:-
As mentioned above, there are 3 steps that must be taken in calculating a
Sale Line. When you click on the Step 1, Step 2 and Step 3 buttons, the
options for that step appear in the Step Options box below. For each step
you must select the Action to take and the rounding options.
- Action
Can be "Extend Line Total", "Calculate Discount" or "Calculate Tax". Each of
these actions must occur in one of the 3 steps. What you are doing
here is changing the order in which these actions are taken.
- Rounding
Allows you to specify "No Rounding" or various other rounding options that
can occur at each step. If "No Rounding" is selected for Step 3 and there
is a fraction of a cent in the final amount, SELLmatix will round the final
amount to the nearest cent regardless.
Back to top
| |
| Configure Comms |

Point of Sale systems communicate will devices such as Barcode Scanners,
Scales, Ticket Printers and Cash Drawer in a number of different ways, and
communication ports are one of the most common of these. Often these
serial and parallel ports have names such as COM1 or LPT2 and so forth,
however depending on the hardware involved they can be called anything.
SELLmatix can control up to 4 of these devices at the same time, and there
are four Comms Channels that can be set up to match the configuration of
the hardware that is connected. The configuration options for each channel
are the same, and these are as follows:-
NOTE:
Changing these options requires that the user be logged into Windows with
rights as an Administrator on that local machine. If the user has
Administrator rights, a message at the bottom of this Dialog will warn that
the user has Administrator Rights and that any changes will affect All
Users on this computer. If the User does not have rights as a Windows
Administrator on this machine, the fields will be displayed, but they will
be grayed out, and a message will be shown saying that Administrator
Rights are required to make changes to this screen.
- Port Name
This is the name of the hardware Port, and is typically something such as
COM2, LPT3, or COM8. Refer to your hardware documentation or Device Manager
in Control Panel for the correct name.
- Type
This can be Serial or Parallel. Parallel devices are generally used for
output, to devices such as printers, while Serial devices are slower, but
support both input and output. There are many more options that can be
configured for Serial Devices, and if the device is a Parallel port,
these options will be grayed out.
- Baud
This refers to the speed at which data moves through the port,
and must match the baud rate of the device connected to the port in
Port Name.
- Parity
This refers to one way that the devices check for data
transmission errors. This setting must match the parity of the device
connected to the port in Port Name.
- Data Bits
Refers to the word size of the data passing over the line. This setting
must match the data bits of the device connected to the port in
Port Name.
- Stop Bits
Refers to the way the devices distinguish between one character of data and
the next. This setting must match the stop bits of the device connected to the
port in Port Name.
- Handshake
Refers to the way that the devices notify each other when they are able to
receive more data, or when their internal buffers are full. This setting
must match that of the device connected to the port in Port Name, otherwise data can be lost or fail to be transferred. We
strongly recommend using DTR/DSR or RTS/CTS instead of XON/XOFF or NONE.
- Line
Some devices require that signaling lines in a serial interface be asserted
in addition to using the handshake lines. One common solution in this
situation is to make special serial cables. SELLmatix however allows these
lines to be configured in software. Experiment with this setting only
if you are having trouble with communications.
- Device
In addition to normal comms ports the SELLmatix comms drivers are able to
control ELO and Micro Touch Screens. It is normally preferable to use drivers
supplied by the touch screen manufacturer, however there can be cases where
those drivers have conflicts with other POS devices. In those cases, you can
use the SELLmatix Touch Screen Drivers.
- Port State
On occasion, certain devices used by SELLmatix POS may also need to be
controlled by other software that is running on the POS computer. Two common
examples are where SELLmatix is integrated with an Ingenico EFT pinpad, which
prints electronic fund transfer receipts on the same printer that SELLmatix
uses, or where the ticket printer is also shared by promotions software.
This is only possible on output devices such as printers, and if such
device sharing is required, the port needs to be configured in SELLmatix as
"Open on Demand". In that way, SELLmatix will open the device when necessary,
and close it when SELLmatix is finished accessing the device, leaving it
available for other software.
Back to top
| |
| Account Printer |
|
Account printing is used in a restaurant environment where customers have multiple orders which are processed and the orders delivered,
then at the end of the meal they ask for the account which is printed by SELLmatix Control. After the account is printed, it is
presented to the customers, the waiter takes the payment to a POS terminal, Retrieves the sale and processes
the payment.
This menu option is used to select the Account printer to be used.
When this option is selected the following Dialog appears:-
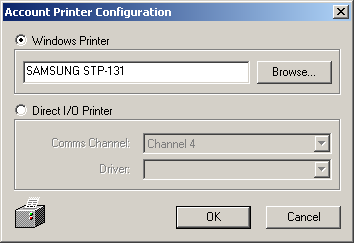
The options which can be specified are as follows:-
- Windows Printer
This button should be checked if you wish to use a printer that has a
proper windows printer with a windows printer driver supplied by the
manufacturer, and which can be configured through the
Start->Settings->Printers.
Where this option is available we strongly recommend its use as Windows
printers offer significantly improved graphics and performance compared
to older direct I/O printers.
When this option is selected you can type in the name of the printer, or
browse for a printer. It is possible to use a printer that is shared over
the local LAN for printing in SELLmatix.
- Direct I/O Printer
This button would be selected if you were using a printer connected
directly to a serial or parallel port. In this case one of the Comms
Channels needs to be set up to handle this port, and a driver selected so
the SELLmatix POS knows the control codes to be sent to the printer to
perform specific functions.
Back to top
| |
| Label Printer Config |
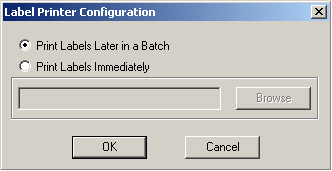
SELLmatix Control supports two different label printing methods.
- Special label printers
which are designed to print labels on rolls of paper. Typically these use Thermal Transfer printing
and are designed for both large volumes of labels and printing labels one at a time. Many sites do not have
specalised label printer because they cannot justify the cost of having a printer just for printing labels. If you do have such a printer
selecting it here means that labels can be printed on demand.
- The other method SELLmatix can use for printing labels is to use a page printer where there are a number
of labels on a preformatted page. Standard forms are available from stationery suppliers in a wide range of formats.
The problem with this method is that even if only one or two labels are required, an entire sheet of paper must
be fed through the page printer. Even though SELLmatix provides a means to reuse unused labels on a previously used
sheet, this can be inconvenient, and it is better to print labels later in a batch. In this case, the printer is
selected later when the batch of labels is to be printed.
Back to top
| |
| Order Printers |
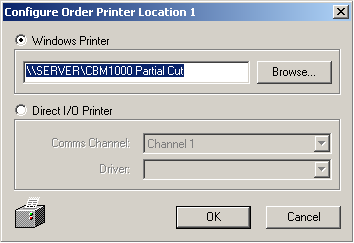
Order printers are typically used in a bar/restaurant environment, and when orders are placed at the Point of Sale they are automatically printed at the
appropriate location so that the orders can be prepared. In some cases there may be a single printer in the kitchen, while in other cases there may be another printer
in the Bar. SELLmatix Control supports up to 9 different Order Printers.
The printer on which an order is printed is specified in the PLU maintenance screen, where you can specify the Location to notify when the product is ordered.
SELLmatix supports two different types of Order Printers as follows:-
- Windows Printer
This button should be checked if you wish to use a printer that has a
proper windows printer with a windows printer driver supplied by the
manufacturer, and which can be configured through the
Start->Settings->Printers.
Where this option is available we strongly recommend its use as Windows
printers offer significantly improved graphics and performance compared
to older direct I/O printers.
When this option is selected you can type in the name of the printer, or
browse for a printer. It is possible to use a printer that is shared over
the local LAN for printing in SELLmatix.
- Direct I/O Printer
This button would be selected if you were using a printer connected
directly to a serial or parallel port. In this case one of the Comms
Channels needs to be set up to handle this port, and a driver selected so
the SELLmatix POS knows the control codes to be sent to the printer to
perform specific functions.
Back to top
| |
|